Create an account, choose a plan and add your website. Then review your business details, add tracking, connect Google and link your AI if you want to use it. You can skip setup steps and finish them later.
How Sextant works
Connect visits, search performance and AI visibility to understand how people find and use your website. Here is how the parts fit together.
| Part | What it is | What it tells you |
|---|---|---|
| Workspace | Holds your sites and shares one plan. Every account starts with one, named My Workspace until Sextant names it after your business. | Who can open which site, and who pays |
| Site | One website, by its domain, with its own setup, settings and people. | Everything below is kept per site |
| Tracking code | One short script on every page. It counts visits without cookies and cannot change your site. | Who visits, from where, and what they do |
| Google data | Google Search Console and, if you want, past visits from Google Analytics 4. Read only. | Which Google searches show your site, and how often people click |
| Research credit | A monthly amount for research outside your site: rankings, competitors, backlinks, keyword ideas and AI answers. | Where you stand in Google and in AI answers, next to your competitors |
| AI connection (MCP) | A link between your AI app and your Sextant account. | Whatever you ask your AI about your sites |
| Dashboard | The web app at app.sextantweb.com. | The same data, on charts and lists |
MCP (Model Context Protocol) lets an AI app use another service’s tools and data. Add Sextant’s connector, sign in and approve access. Your AI can then answer questions using the sites and permissions available to your Sextant account.
Before you start
Only the first item is required. The others make the later steps go smoothly.
- Your website’s address, for example example.com.
- Access to where your site is built (WordPress, Webflow, Shopify, Squarespace, Wix, Framer or your own code), or the name of the person who has it. The tracking code goes there.
- The Google account that manages your site in Google Search Console or Google Analytics, if you use them.
- An AI app such as Claude or ChatGPT, if you want to ask questions in chat. Sextant also works on its own, in the dashboard.
Sign in or create your account
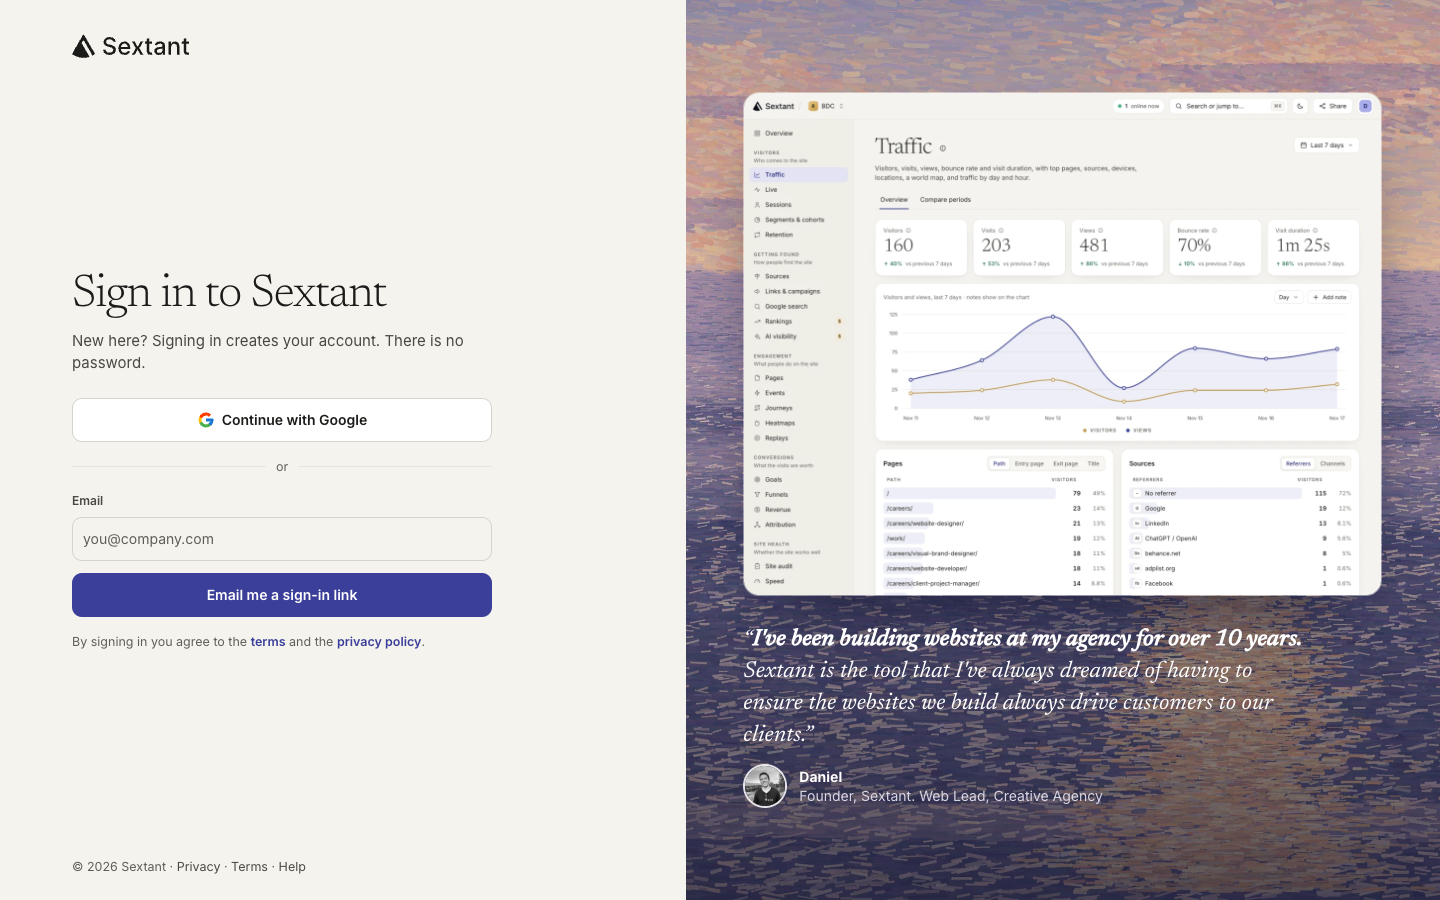
There is no password. Signing in with a new email creates your account.
- Open app.sextantweb.com/sign-in.
- Click Continue with Google, or type your email and click Email me a sign-in link.
- With email: open the link on the same device and click Sign in. The link works once and expires 15 minutes after Sextant sends it.
Optional: start with the free website check
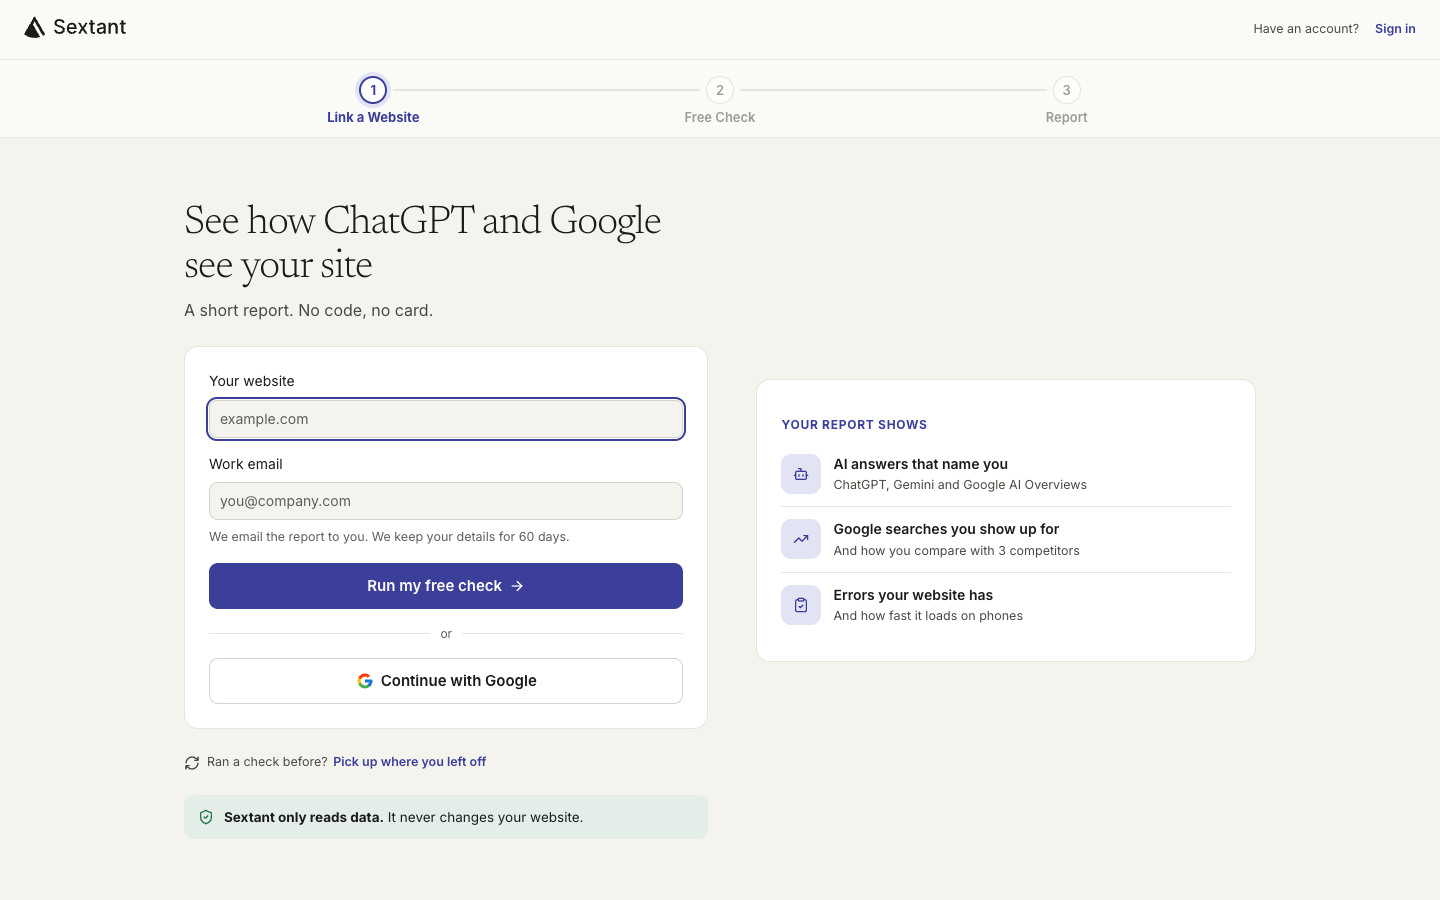
If the free check is open, app.sextantweb.com/check gives you a short report before you pay: AI answers that name you in ChatGPT, Gemini and Google AI Overviews, the Google searches you show up for next to 3 competitors, errors on your site and its speed on phones.
- Type your website and your work email, or click Continue with Google.
- Check what Sextant found: competitors, business overview, positioning and ideal customers. Fix anything wrong, then click Looks right.
- Read the report. It shows once, and the report email is your copy. Every fix, who visits your site and your AI answers each week open in Sextant after you choose a plan.
- Click Pick a plan and start. After the plan, the Add button with your domain copies the details you confirmed into your new site.
Choose a plan
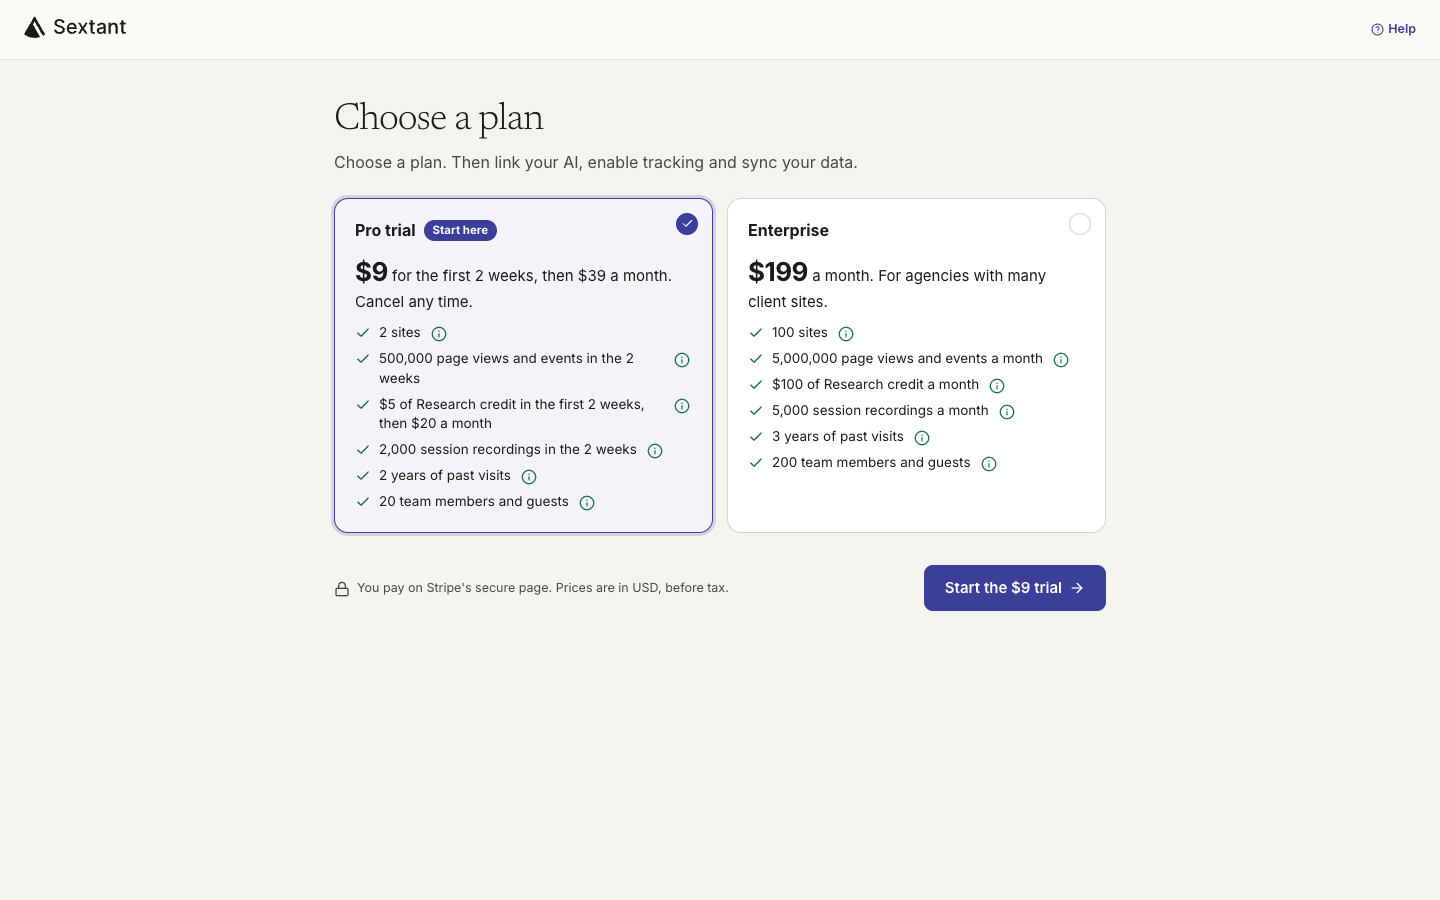
A workspace needs a plan before it can hold sites, so new accounts land on Choose a plan right after sign-in.
| Pro trial | Pro | Enterprise | |
|---|---|---|---|
| Price | $9 for the first 2 weeks, then Pro | $39 a month | $199 a month |
| Sites | 2 in the first 2 weeks, then 10 | 10 | 100 |
| Page views and events a month | 500,000 | 500,000 | 5,000,000 |
| Research credit | $5 in the first 2 weeks, then $20 a month | $20 | $100 |
| Session recordings a month | 2,000 | 2,000 | 5,000 |
| Past visits kept | 2 years | 2 years | 3 years |
| Team members and guests | 20 | 20 | 200 |
- Pick a card. A new Owner sees the Pro trial and Enterprise; an Owner who has paid for a workspace before sees Pro and Enterprise.
- Click Start the $9 trial, Start Pro or Start Enterprise.
- Pay on Stripe’s secure page. Prices are in USD, before tax.
- Back in Sextant, Confirming your payment moves on to Add a website by itself.
Add your website
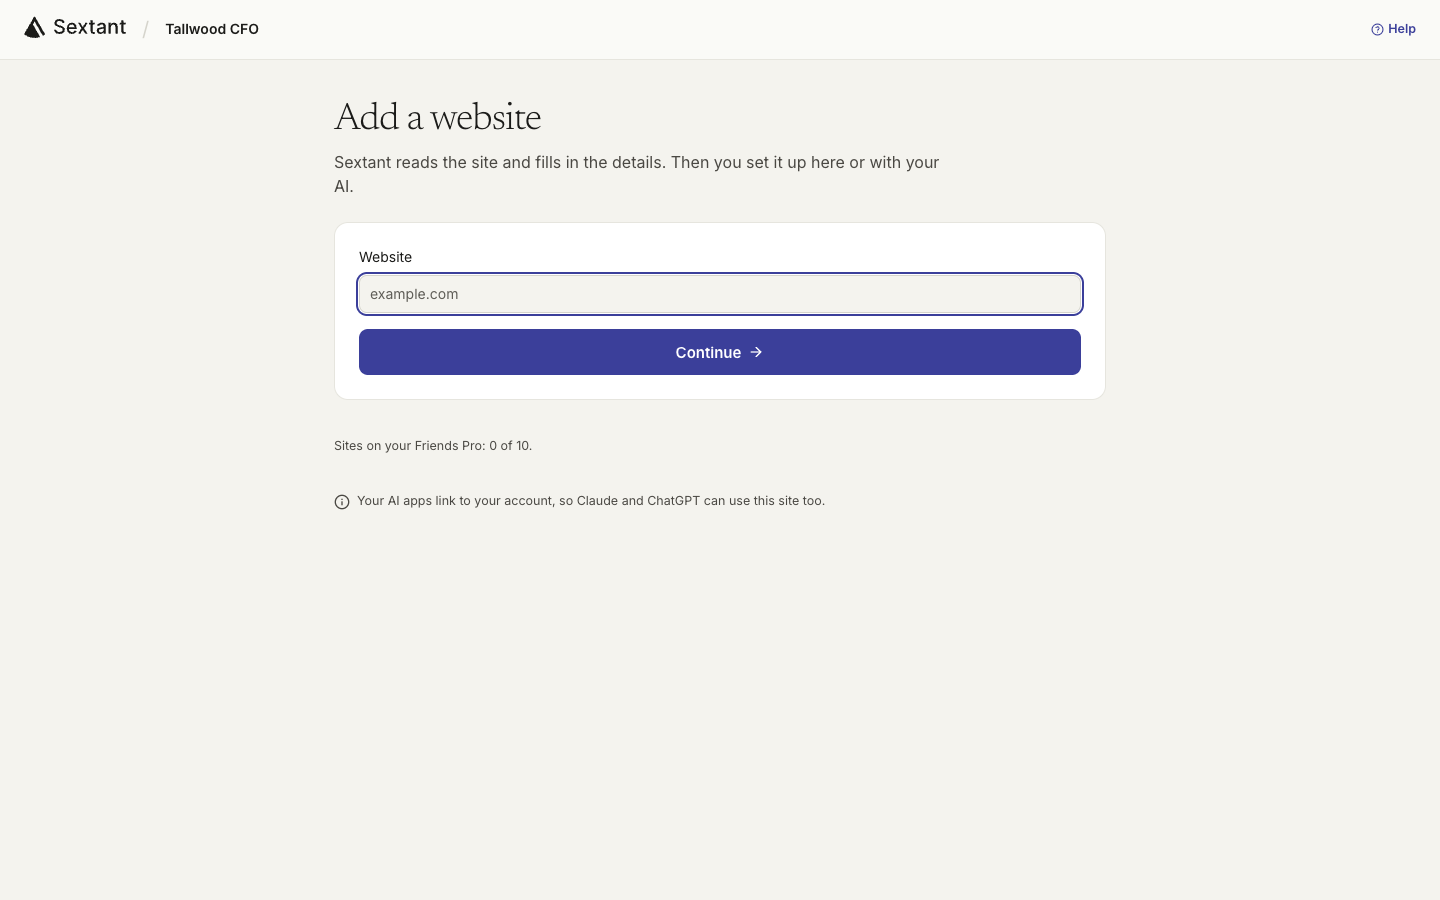
Type the address only. Sextant reads the public pages of your site and fills in the business details for you.
- On Add a website, type your domain, for example example.com, and click Continue.
- Your site’s setup opens. Sextant reads the site in the background while you go on.
To add another site later, open All sites and click Add site, or go straight to Add a website. If you own more than one workspace, the page says which one the site goes to and links to the others.
The five setup steps
Your site’s setup page shows five steps. Progress reflects the work already done, including steps completed through your AI.
| Step | What you do | Who can do it |
|---|---|---|
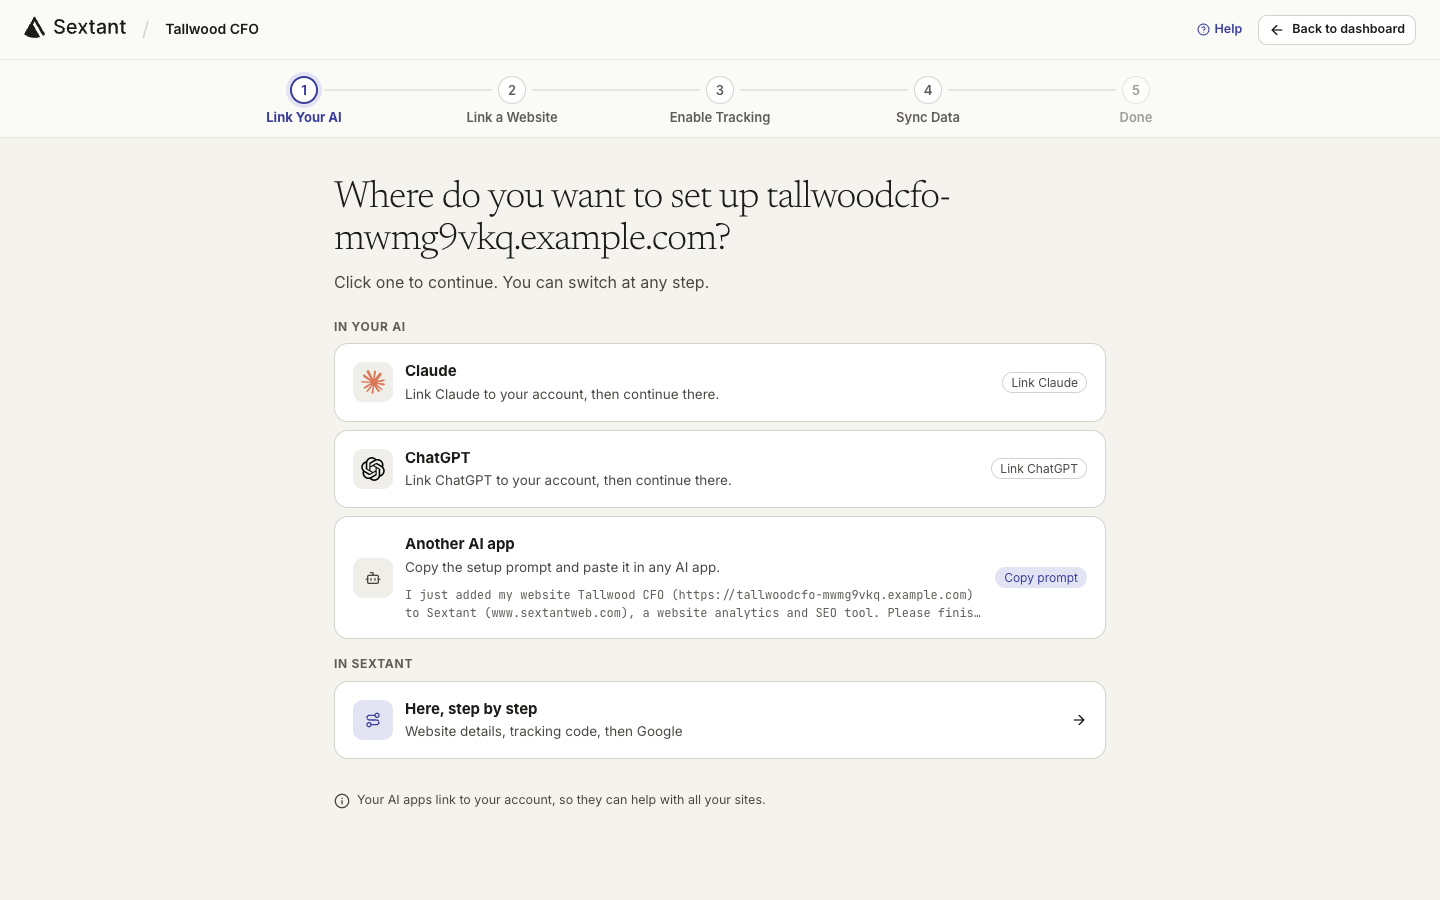
| Link Your AI | Connect Claude, ChatGPT or another AI app, or choose to set up in Sextant. | You |
| Link a Website | Check the competitors, overview, positioning and ideal customers Sextant wrote. | You or your AI |
| Enable Tracking | Put the tracking code on every page and wait for the first visit. | You, your web person, or an AI that can edit your site |
| Sync Data | Sign in with Google once, choose the Search Console property and import past visits. | You, because Google asks you to sign in |
| Done | See what is set up, then continue in your AI or open the dashboard. | You |
Without a free check, Link Your AI comes first, because your AI can fill in the website details for you. After a free check, Link a Website comes first and is already filled in.
- Set up here or Set up with my AI: a switch at the top of each step. Your AI picks up at the step you are on.
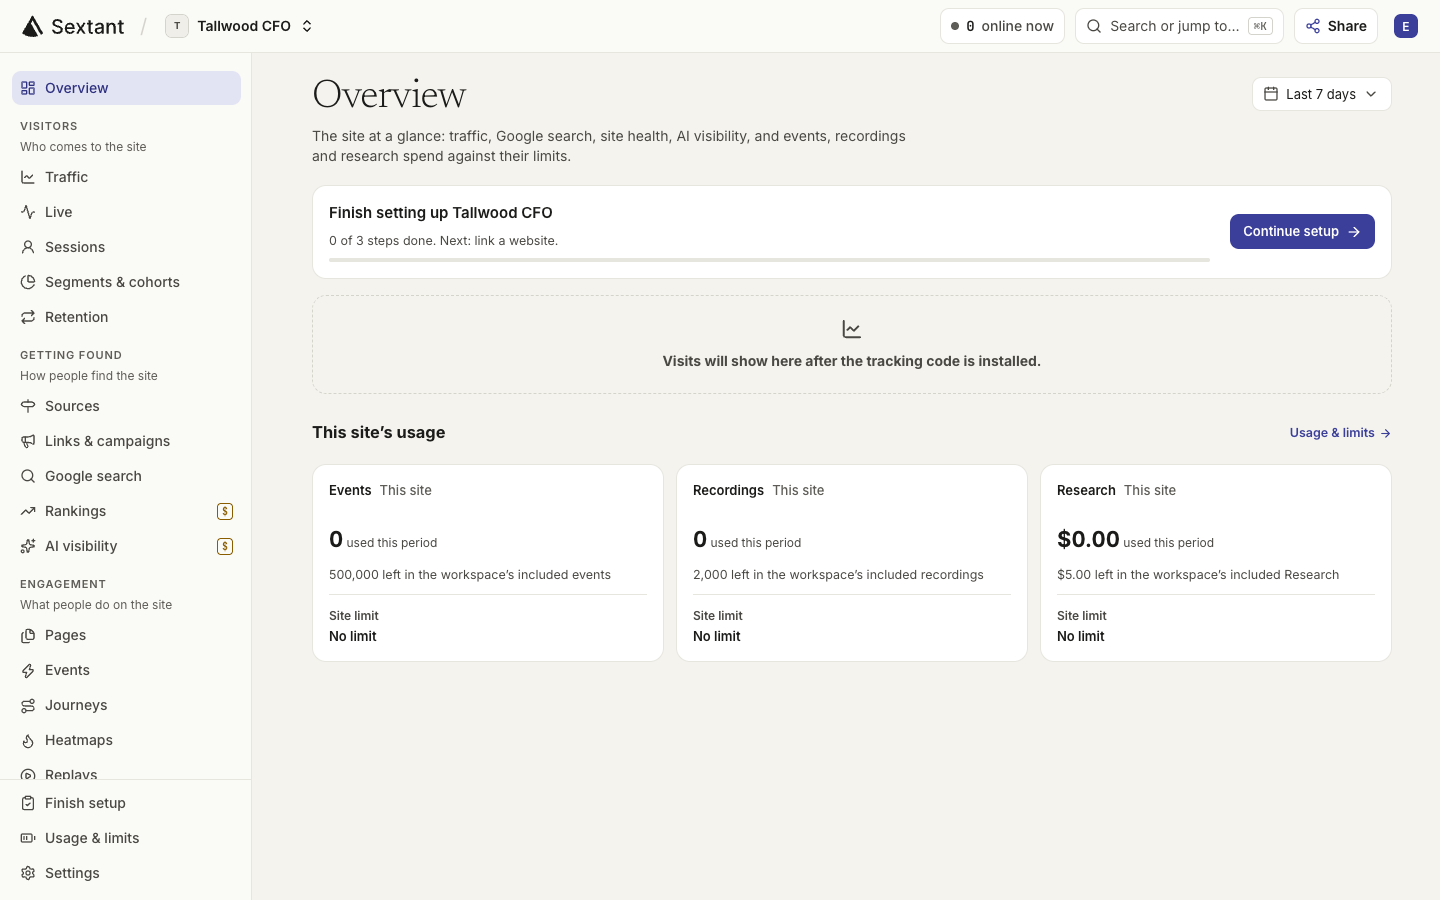
- Skip for now moves on and remembers where you stopped. Come back any time with Finish setup in the site’s sidebar or Continue setup on its Overview.
- Back to dashboard, top right, leaves setup without losing anything.
Link your AI, or set up in Sextant
The first screen asks Where do you want to set up your site. One click on a row does the action.
- Claude or ChatGPT: if the app is not linked yet, Sextant opens it: Claude at its connector form (with Sextant’s address copied), ChatGPT at Sextant’s app (opens in a new tab), where you click Connect. Then click Allow on the Sextant page that opens. Once an app is linked, its row says Set up with Claude (or ChatGPT), and a click opens the app with a ready setup prompt.
- Another AI app: Copy prompt copies a setup prompt for any app that supports MCP connectors. If the app is not connected yet, the prompt shows how to connect it.
- Here, step by step, under In Sextant: website details, tracking code, then Google, all in Sextant.
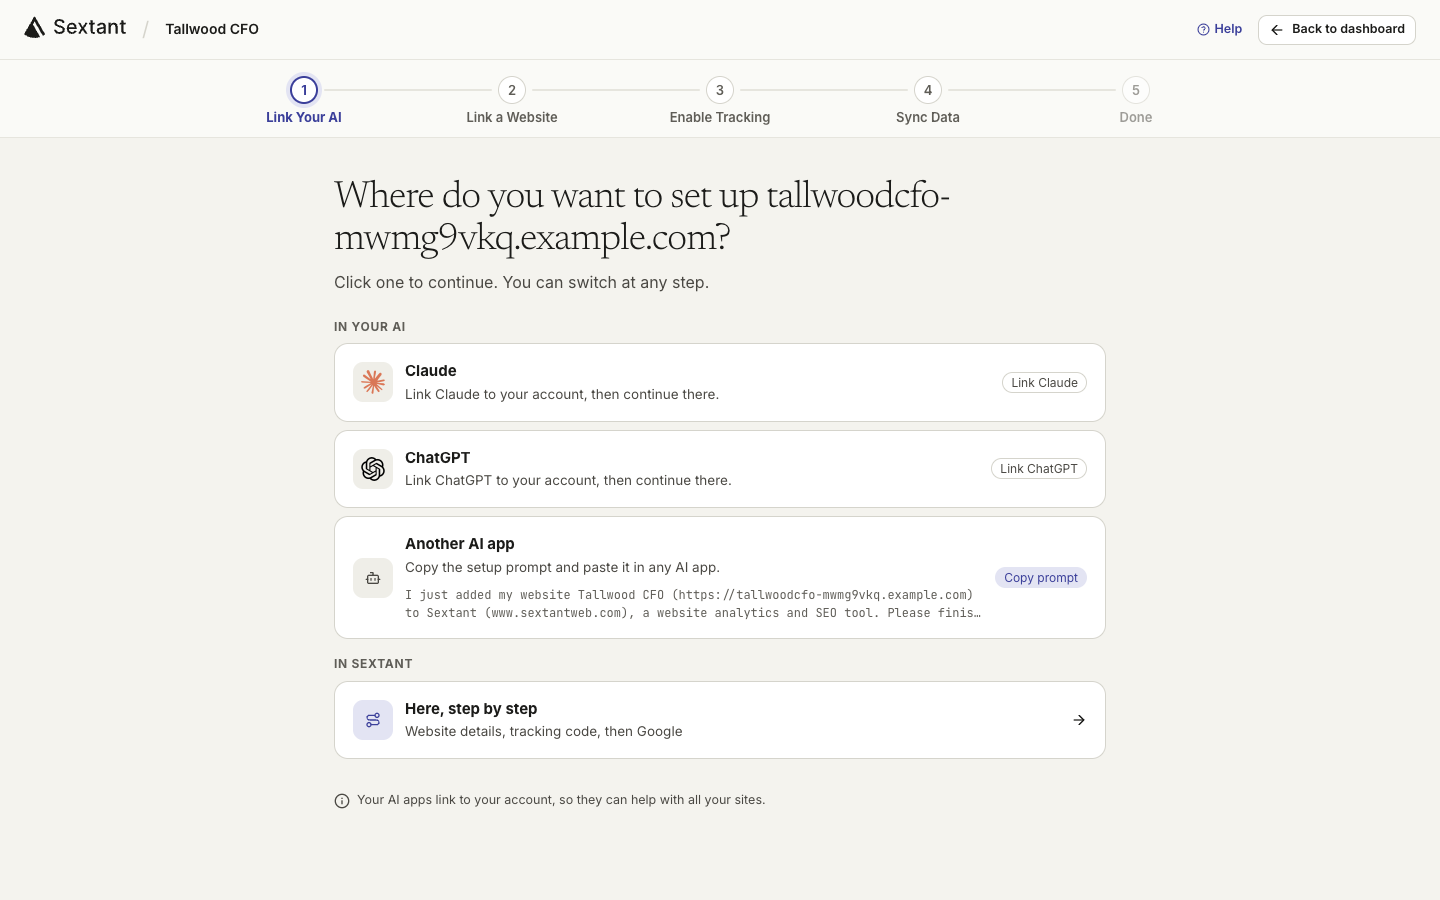
The page waits for your AI’s first request to confirm the connection. Once it arrives, you can continue setup in your AI. Claude · ChatGPT · Other apps.
Check your website details (Link a Website)
Review these details so Sextant and your AI can give more relevant suggestions.
The step is titled Check followed by your domain. While Sextant is reading your website shows, the fields fill in by themselves. You can also write them yourself.
- Competitors: their domains. AI visibility checks and research compare you with them.
- Business overview: what the business sells or offers, for whom, and where.
- Positioning against competitors: how the business is different.
- Ideal customers: a short name and a description for each type of customer.
Keep at least 1 competitor, an overview and 1 ideal customer, then click Save and continue. You can change all of it later in the site’s Settings › Business profile and Settings › Competitors.
Add the tracking code (Enable Tracking)
This is the step that makes visits show up. The screen is titled Add Sextant to your domain: one short code counts visits, without cookies, and cannot change your site.
- Tracking settings: keep Recommended (speed from real visitors is on, and browsers that ask not to be tracked are not counted), or open Advanced to choose what the code collects. Heatmaps and session replays can be turned on later in Settings › Tracking.
- Where is your site built? Click your builder. When Sextant can tell, it says “We think your site uses” the builder it found.
- Follow Do these 3 steps for your builder. Official guide opens the builder’s own help page.
- Click Copy code and paste it where the steps say. For Google Tag Manager, the button says Copy Tag Manager code.
- Publish your site, then open it once in a new tab. The status line changes from Waiting for the first visit to Sextant receives visits from your domain.
- Click Continue. If someone else is adding the code, click Skip for now: the step stays open until the first visit arrives.
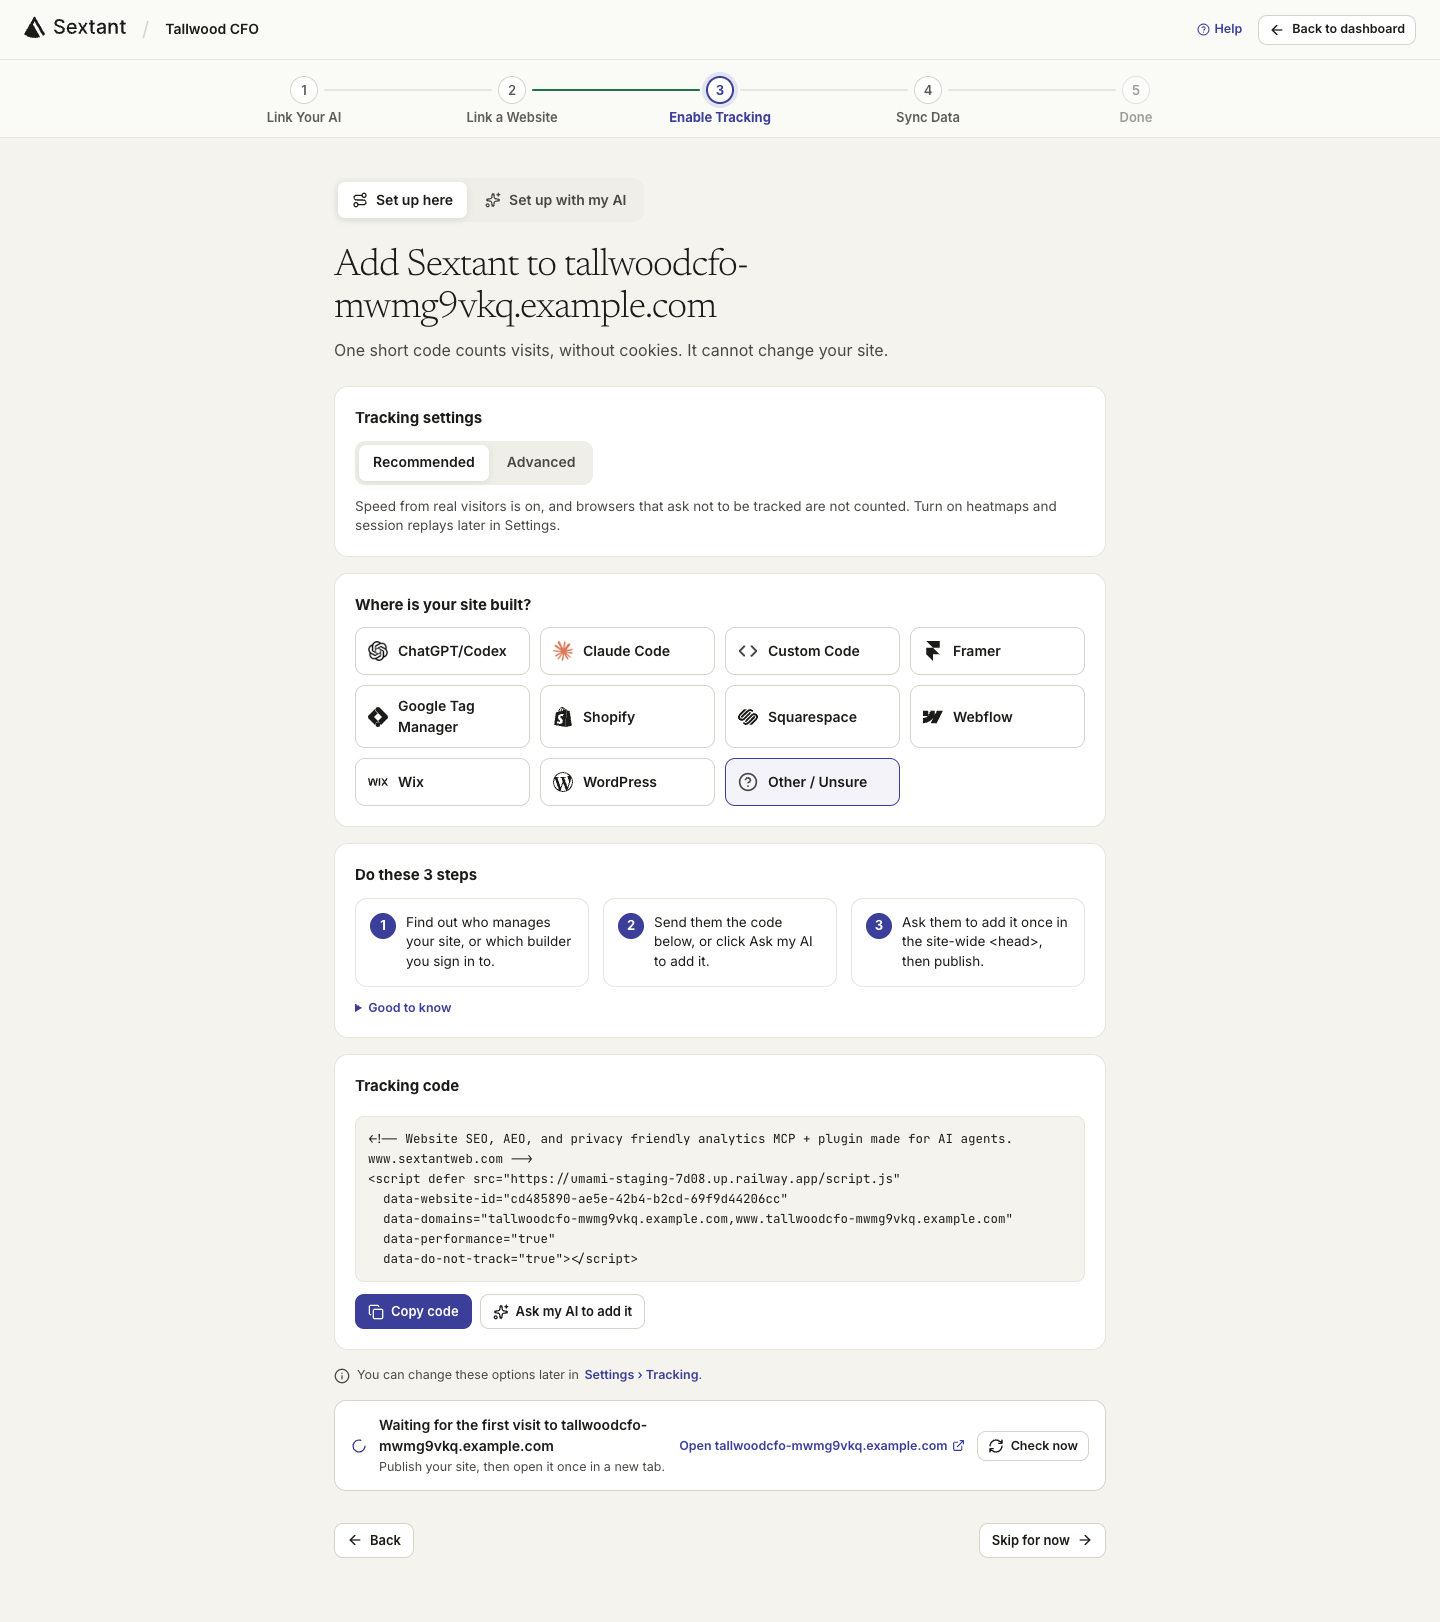
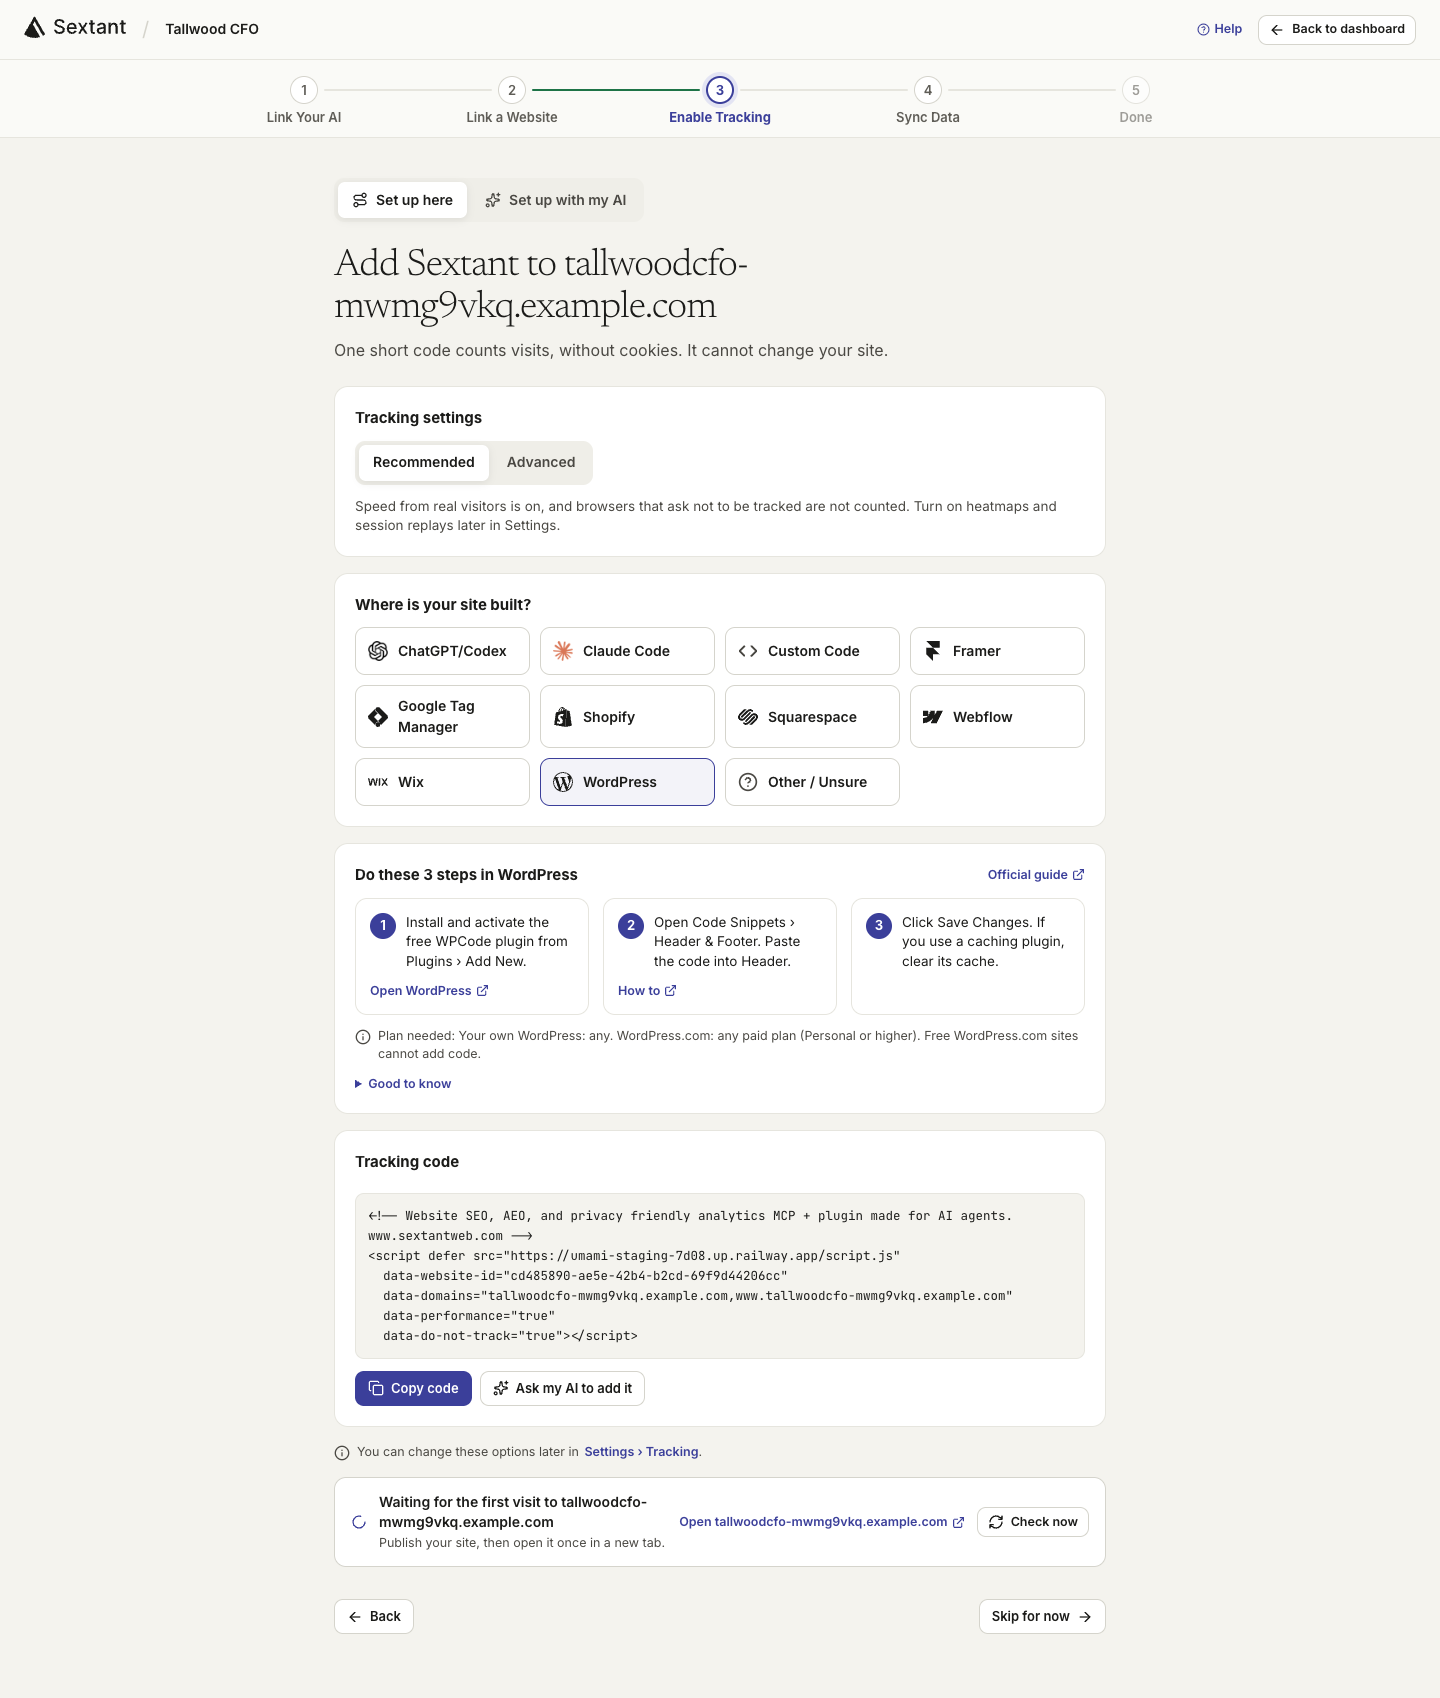
Where the code goes in each website builder
Every builder has a place for code that runs on every page. These are the places Sextant’s setup shows, checked against each builder’s own help pages.
| Builder | Where to paste the code | Plan needed |
|---|---|---|
| WordPress | Install the free WPCode plugin (Plugins › Add New), open Code Snippets › Header & Footer, paste into Header and click Save Changes. Then clear your caching plugin. | Your own WordPress: any. WordPress.com: a paid plan |
| Webflow | Site settings › Custom code › Head code, click Save changes, then publish to your custom domain. | A paid Site plan, or a Core, Growth, Agency or Freelancer Workspace |
| Shopify | Online Store › Themes › … › Edit code, open layout/theme.liquid and paste right before the closing head tag. Click Save. | Any plan with the Online Store |
| Squarespace | Pages › Custom Code › Code Injection, paste into Header and click Save. On version 7.0: Website Tools › Code Injection. | Core, Plus, Advanced or some older plans |
| Wix | Settings › Custom Code › + Add Custom Code. Choose All pages, load once per visit, Place Code in: Head, then Apply. | A Premium (Wix Editor) or Studio plan with a connected domain |
| Framer | Site Settings › Code › Add Script. Placement: Start of head, Pages: All, Run: Once. Then Publish. | A paid plan for your own domain |
| Google Tag Manager | A Custom HTML tag with the All Pages trigger, then Submit and Publish. | Free; the container must be on every page |
| Custom Code | Right before the closing head tag in the layout every page uses, then deploy. | None |
| ChatGPT/Codex or Claude Code | Ask it to add the code inside the head of the shared layout, then deploy the way you normally do. | Any ChatGPT plan includes Codex. Claude Code needs a paid Claude plan or a Console account |
| Other / Unsure | Find out who manages the site, send them the code, and ask them to add it once in the site-wide head. | Depends on the builder |
- WordPress.com: adding code to headers (opens in a new tab)
- Webflow: custom code in head and body tags (opens in a new tab)
- Shopify: edit theme code (opens in a new tab)
- Squarespace: code injection (opens in a new tab)
- Wix: embedding custom code (opens in a new tab)
- Framer: how to add custom code (opens in a new tab)
If you use Google Tag Manager
Tag Manager strips the settings from a pasted script tag. So when you choose Google Tag Manager, Sextant shows a different version, the Tag Manager code, which sets them itself. Your Tag Manager container must already be on every page.
- In Tag Manager (opens in a new tab), open your container, then Tags › New › Tag Configuration › Custom HTML.
- Paste the Tag Manager code from Sextant. Click Triggering › All Pages, then Save.
- Click Submit, then Publish. Google’s help: Custom HTML tags (opens in a new tab).
When a developer or agency adds the code
If someone else runs your site, they need two things from you: the code, and where it goes.
- In Enable Tracking, choose the builder your site uses, or Other / Unsure.
- Click Copy code and send it with the 3 steps shown, or with the message below.
- When they say it is live, come back to Enable Tracking and click Check now.
Hi, could you add Sextant’s analytics code to our website?

- Add it once, site-wide, inside <head> (the layout or template every page uses), not in one page’s settings.
- Keep the code exactly as it is, then publish.
- If the site has a strict Content-Security-Policy, allow https://t.sextantweb.com in script-src and connect-src.

[paste the code from Sextant here]
Or give them access: in your site’s Settings › People, invite them with the Admin level. They then see Settings › Tracking and the setup page, and can click Check now themselves. How to invite someone.
Check that tracking works
- In setup: once the first visit arrives, the status line under the code says Sextant receives visits from your domain. The page checks again every few seconds while it is open.
- Check now opens your live site in a fresh browser and looks for the visit. You can run it once every 30 seconds.
- In the dashboard: open the site’s Live page, under Visitors, and visit your site in another tab. Live shows the last 30 minutes.
- In your AI: ask “Is the Sextant tracking code working on my site?” It runs the same test visit.
- In your page’s source: look for t.sextantweb.com/script.js inside the head.
Connect Google (Sync Data)
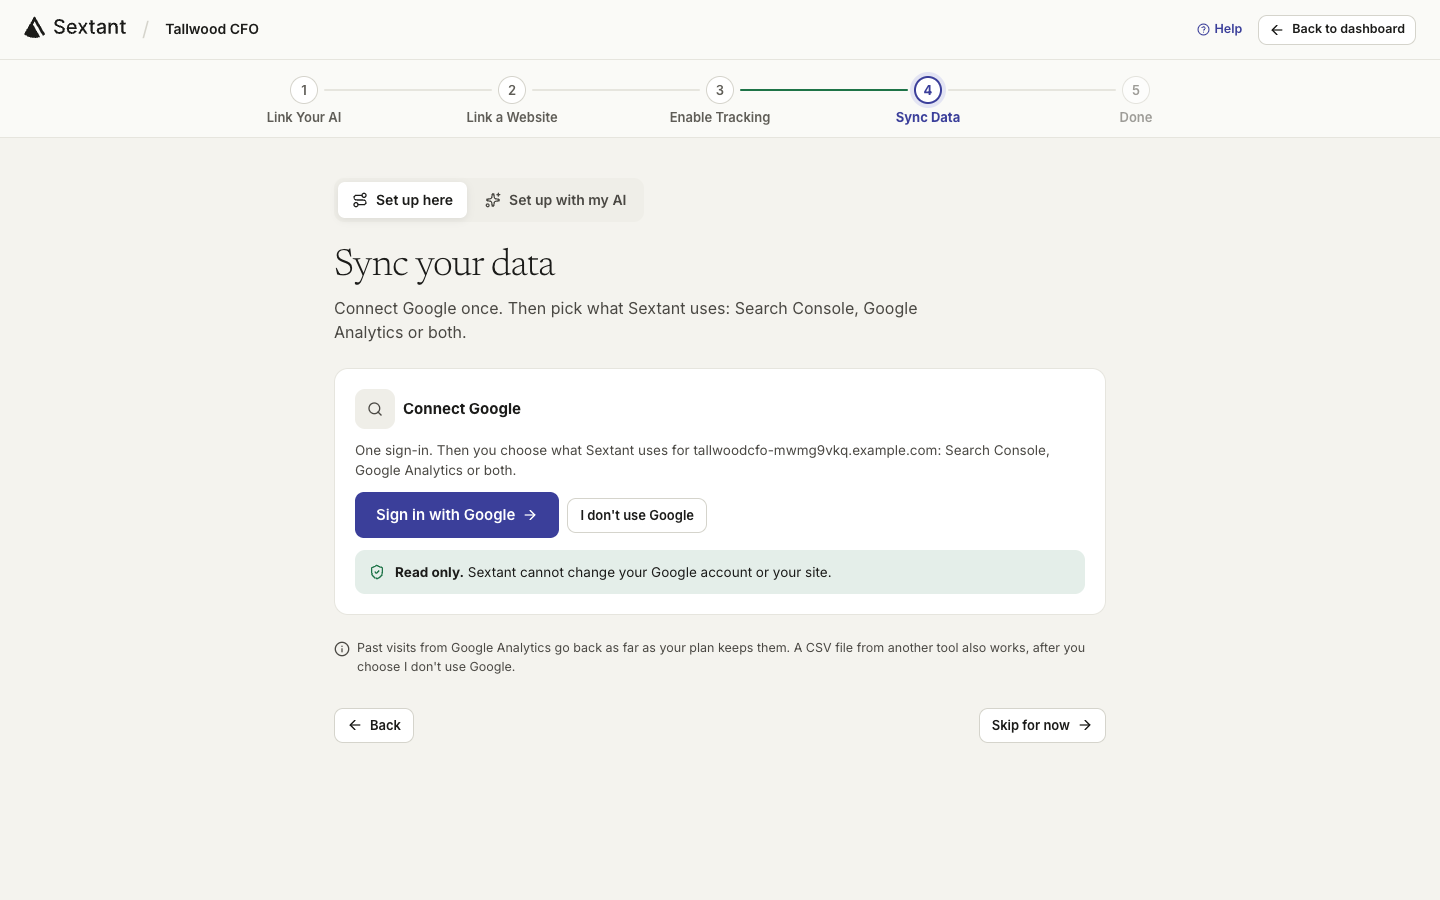
Connect Google Search Console for search clicks and positions, and GA4 for past visitor data. One Google sign-in covers both. Sextant only reads this data.
- In Sync Data, click Sign in with Google.
- Choose the Google account that manages your site in Search Console or Google Analytics.
- On Google’s screen, leave both boxes checked to use both sources, or uncheck the one you do not want.
- Back in Sextant, choose your property under Search Console, and import past visits under Past visits if you want them.
- Click Continue. Skip for now moves on and leaves the step open.
Search Console: verified or not
Search Console lists only the sites you have verified with Google. What you see after the sign-in depends on that.
| What you see | What it means | What to do |
|---|---|---|
| Your site, marked Owner or Full user | It is verified in this Google account | Pick it, then click the Use button with its name |
| Your site, marked Not verified | Someone added it but did not finish verifying it | Verify it (below), then click Refresh properties |
| Your site is not in the list | This Google account has no property for it | Open Don’t see your domain, or connect another Google account |
| “This Google account has no Search Console properties” | Wrong account, or Search Console was never set up | Connect another Google account, or verify the site (below) |
Domain or URL-prefix? Each property in the list says which kind it is.
| Property type | What it covers | How Google verifies it |
|---|---|---|
| Domain property (example.com) | Every subdomain, with both http and https | A DNS record only |
| URL-prefix property (https://www.example.com/) | Only addresses that start with that exact prefix | Several ways, such as an HTML file or tag, Google Analytics or a DNS record |
If you have both, pick the Domain property: it gives the fuller picture.
Let Sextant verify it. Sextant can verify your domain as a Domain property with one DNS record:
- Open Don’t see your domain and click Allow Sextant to verify sites. Google asks once for permission to verify your domain and add it to Search Console.
- Click Get the DNS record.
- Open your DNS settings. Sextant links to your DNS host when it knows it; otherwise it is usually where you bought the domain.
- Add a record with Type: TXT, Name or Host: @, and the value Sextant shows. Save it.
- Back in Sextant, click Verify now. If Google cannot see the record yet, wait a little and click it again: DNS changes take a while to spread.
Once it is verified, Sextant uses the new Domain property. Google then needs some time before its first search data arrives.
Or verify it yourself: open Search Console (opens in a new tab), add a Domain or URL-prefix property and follow Google’s steps (opens in a new tab). Then click Refresh properties in Sextant and pick it.
Import past visits from Google Analytics or a CSV file
Imports let your charts start before today. Imported history has no extra usage charge. It covers only the days before Sextant started counting, back as far as your plan keeps history: 2 years on Pro, 3 on Enterprise.
From Google Analytics 4:
- Connect Google with the Analytics box checked. You can also click Connect Google Analytics under Past visits, or in the site’s Settings › Import data.
- Pick the Property. The list shows each property’s name and account, grouped by Google account.
- Choose the From and To dates, then click Import from Google Analytics.
- You can leave the page: the import goes on, and the Imports list shows how far it is.
Not sure which property is yours? In Google Analytics (opens in a new tab), Admin › Property settings › Property details shows the property’s name and ID. The Google account you sign in with needs access to that property.
From a CSV file (HubSpot, Plausible, Fathom, Matomo, Simple Analytics, Universal Analytics or a spreadsheet):
- Under CSV file, click Download the template.
- Put your daily numbers into the template. To let an AI do it, use Ask Claude, Ask ChatGPT or Copy prompt under the form.
- Choose the file (UTF-8, up to 3 MB) and click Import the file.
No Google account? Sextant still works
Click I don’t use Google in Sync Data. Sextant skips Search Console and keeps everything else.
- Visits, pages, sources, goals and funnels come from the tracking code, not from Google.
- Rankings, competitor lookups and AI answers come from Sextant’s own research, so you still see where you stand in Google and in AI answers.
- The Google search page stays empty: only Search Console sends your real clicks and searches.
- Past visits from another tool can still come in as a CSV file.
Change your mind later? Click Connect Google instead in Sync Data, or use the site’s Settings › Integrations. Search Console is free with any Google account: start here (opens in a new tab).
Sites on several domains or subdomains
A Sextant site is one website, by its domain. Its code counts visits only on its Allowed domains: by default, your domain with and without www.
- One site across several hosts, for example a shop on shop.example.com: open the site’s Settings › Tracking, add each host to Allowed domains, separated by commas, and put the same code on those pages too. A Tag helps tell the groups of pages apart.
- A separate view per domain: add each domain as its own site. Each one counts toward your plan’s sites: 10 on Pro, 100 on Enterprise.
- Search Console: pick a Domain property for the site, so Google data covers all of its subdomains.
Done, and your first answers
The last step says your site is set up, with a chip for each part: plan, website, tracking code, Google, first research and your AI app.
- Next: let your AI take it from here: Continue in Claude, Continue in ChatGPT, or Copy the prompt for another app. The prompt asks your AI to check the setup, suggest weekly routines and offer the first fixes.
- Sextant dashboard: Open my dashboard opens the site’s Overview.
- More to set up: Invite your team, Goals, Funnels, Segments and Cohorts. Do them now or later; your AI can do them with you.
Questions worth asking first:
- “What should I fix first on my site?”
- “Which pages and sources brought the most visitors in the last 7 days?”
- “Do ChatGPT and Gemini mention my business? Which competitors do they name?”
- “Which Google searches am I close to page one for?”
Research credit: what costs and what does not
Reading your own data never costs extra. Research outside your site uses the workspace’s monthly Research credit: $5 in the 2-week trial, $20 on Pro, $100 on Enterprise.
- Sextant’s own weekly rankings and AI answers, and the monthly backlinks, use the credit. A site audit’s crawl is free.
- Paid buttons show their cost as a share of the monthly credit, and your AI asks you before each paid lookup.
- Every paid lookup is saved, and opening it again is free.
- Extra usage stays off until the workspace Owner sets a limit in Workspace usage & limits.
- Viewers never see costs or paid tools.
Add teammates
Everyone gets their own login and a level on each site. Their AI app then works at that same level.
| Level | What they can do on a site |
|---|---|
| Owner | One per workspace, and Owner on every site in it. Everything, plus the plan, and adding, moving or deleting sites. |
| Admin | Changes settings and tracking, connects Google, and invites people to the site. |
| Editor | Uses every tool, runs paid lookups, and adds goals, links and notes. |
| Viewer | Sees results only. No settings, costs or paid tools. |
Invite someone to one site:
- Open the site’s Settings › People and click Invite.
- Type one or more email addresses, choose their level on the site, and click Send invite.
- They accept from the email, signing in with that same address. Invites expire after 14 days.
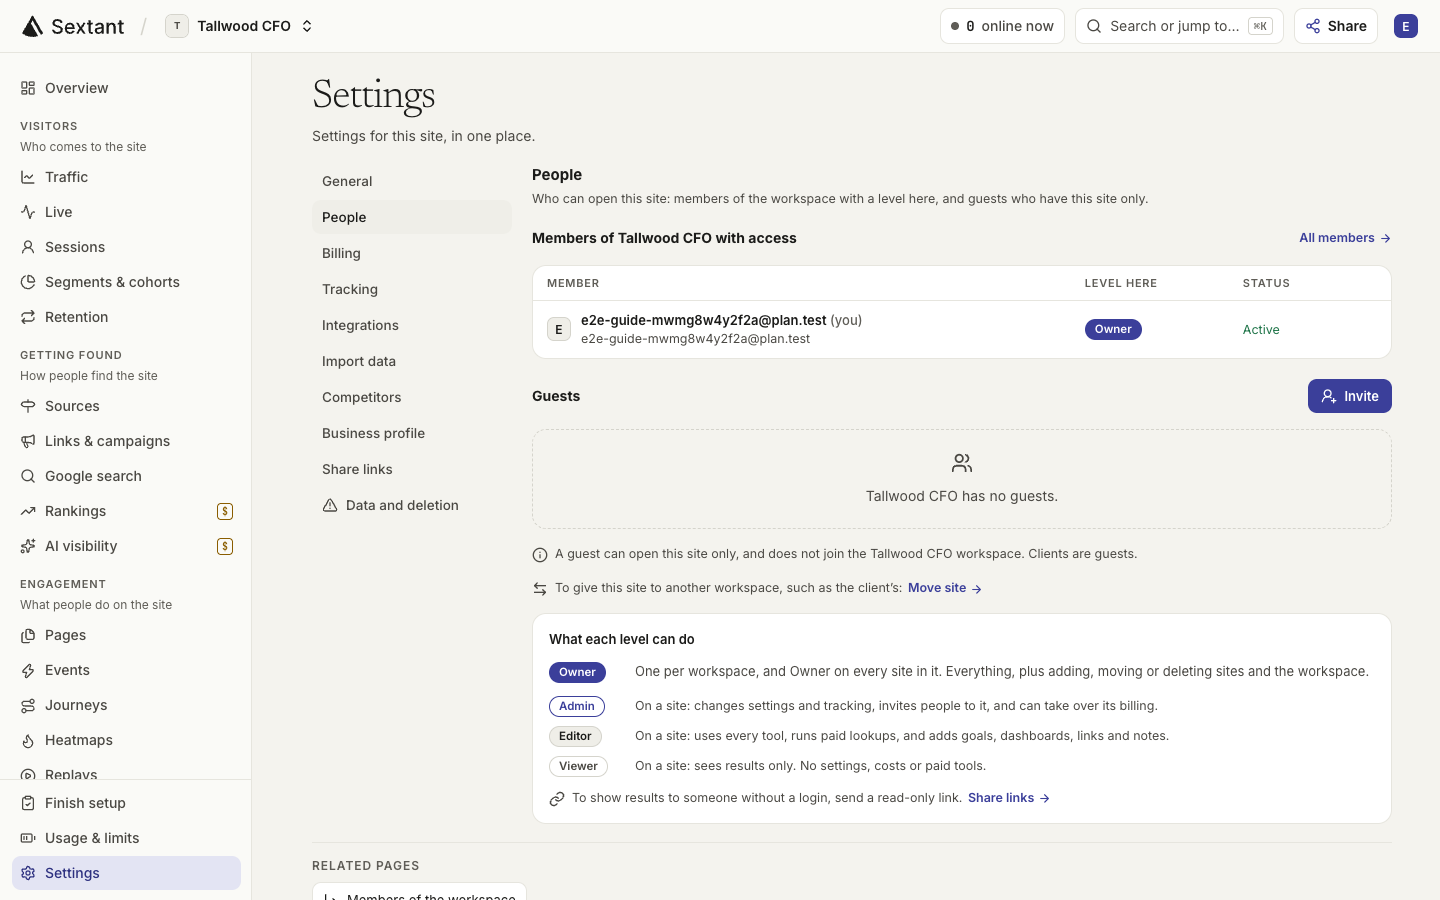
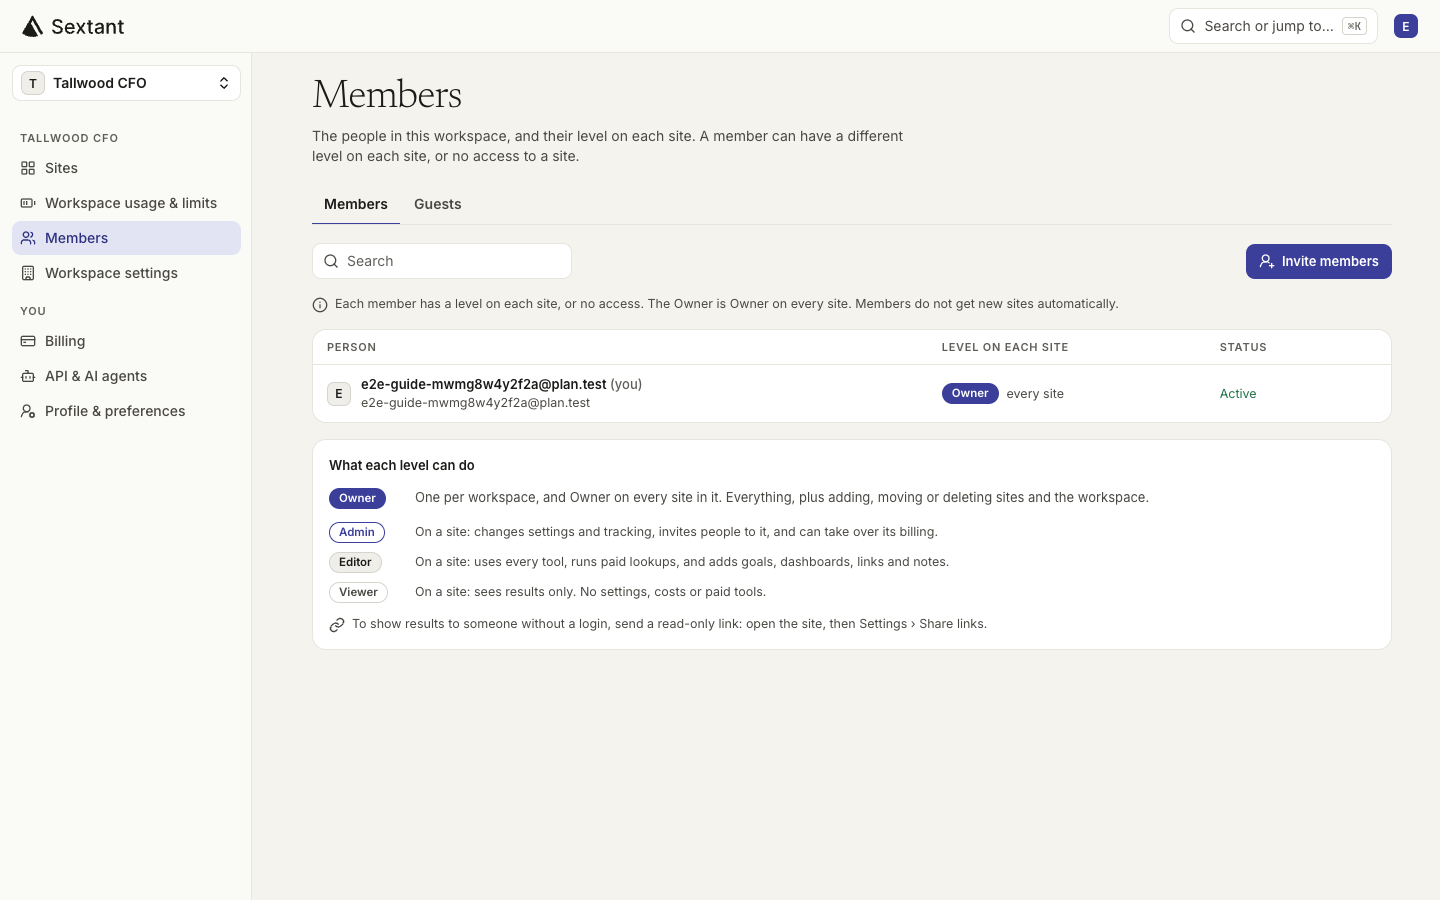
Members and guests. A guest opens only the sites they are invited to and does not join the workspace. A member joins the workspace and gets a level on its sites, one by one. Neither gets new sites automatically.
- In the workspace your account starts with, everyone you invite joins as a guest. Guests can have any level, so this works for a small team.
- For a team workspace with members, open All sites, click the workspace name at the top of the sidebar, then Create workspace. A new workspace needs its own plan.
- In a team workspace, the Members page has Invite members, with Same level on every site or a level for each site. A site’s Settings › People also lets you choose Invite as: Guest or Member.
Give clients and others access
There are three ways to show someone their results. Pick by what they need to see.
| Way | What they see | Login | Where |
|---|---|---|---|
| Guest with the Viewer level | Everything on that site: visits, Google search, rankings, AI visibility and audits. No settings or costs. | Yes, their own | The site’s Settings › People › Invite |
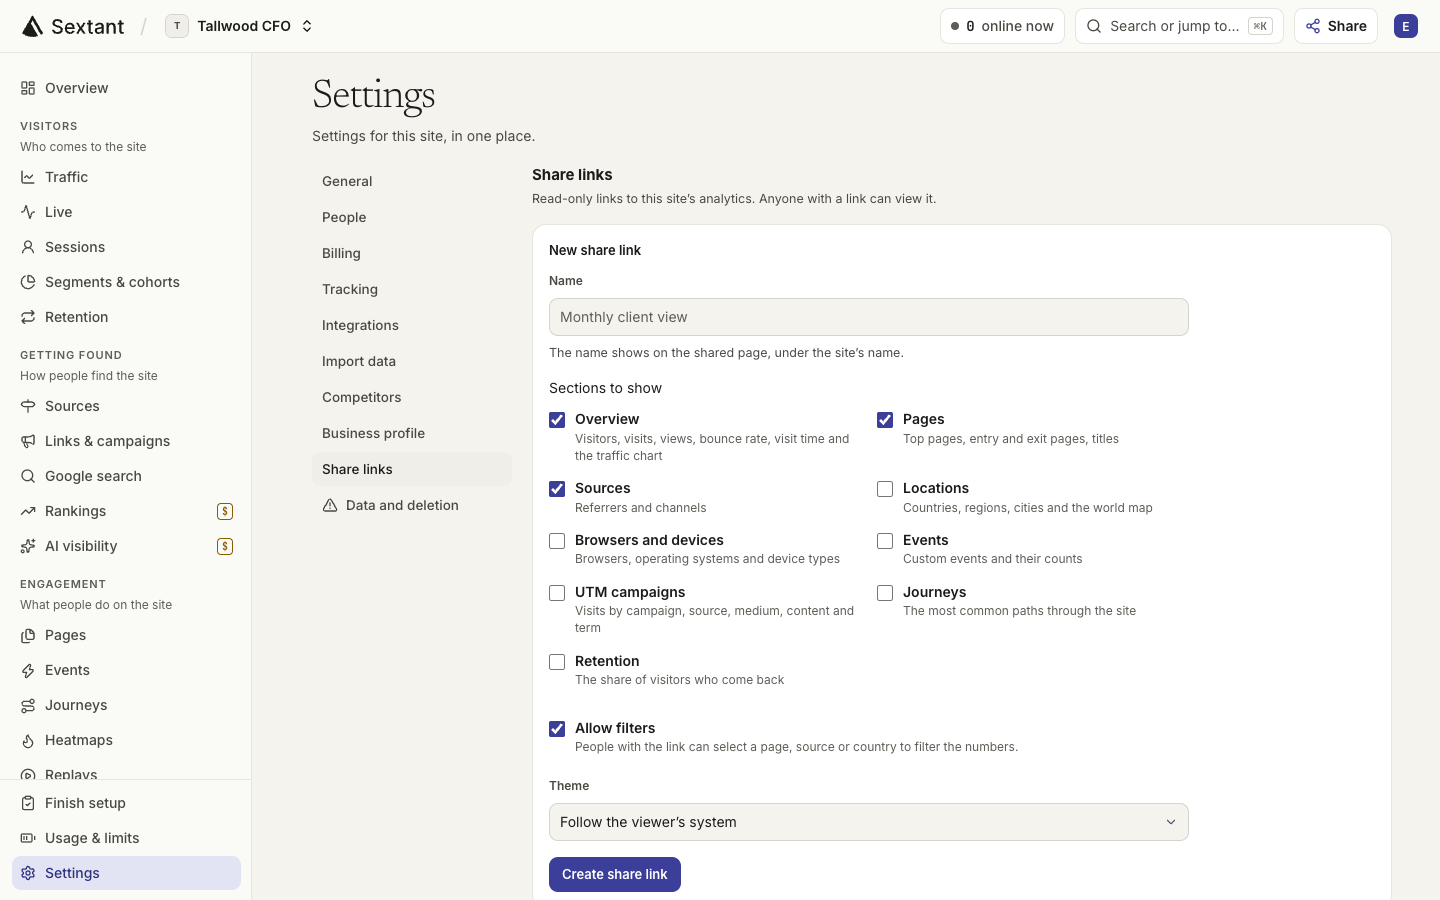
| Share link | Read-only analytics sections you choose, such as Overview, Pages, Sources and UTM campaigns. | No | The site’s Settings › Share links |
| A summary from your AI | What you choose to send: wins, changes and next fixes, in your own words. | No | Your AI app, with Sextant connected |
Create a share link:
- Open the site’s Settings › Share links.
- Under New share link, type a name, pick the Sections to show, choose whether to Allow filters, and pick a theme.
- Click Create share link, then copy the link and send it.
Move a site, or hand it to a client
The workspace Owner can move a site into another workspace they own, for example from their first workspace into a new agency or company workspace.
- Open the site’s Settings › Data and deletion.
- Under Move to another workspace, choose the workspace in Move to and click Move site.
- Confirm. People of the old workspace lose access. The site’s data and settings move with it, and it counts toward the new workspace’s plan.
Handing a site to a client who will own it and pay for it:
- The client creates their own Sextant account, chooses a plan and adds the site.
- You download the site’s data: Settings › Data and deletion › Download all data (.zip).
- The client opens Settings › Import data on their new site: Restore a Sextant export with the settings file, then each analytics CSV file under CSV file.
- The client puts their new site’s tracking code on the website in place of yours. Then the old site can be deleted.
- The client invites you back as a guest with the Admin level, so you can keep working on it.
Connect Claude
Claude connects to Sextant as a custom connector. Anthropic lists custom connectors on the Free plan (one connector), Pro, Max, Ultra, Team and Enterprise.
On your own plan:
- Open Customize › Connectors (opens in a new tab) in Claude on the web or in Claude Desktop.
- Click + Add, then Add custom connector.
- Name: Sextant. Server URL: the address below. Click Continue on each screen, then Add.
- Claude opens Sextant. Sign in with your Sextant email and click Allow.
- In a chat, open + › Connectors and check that Sextant is on.
https://app.sextantweb.com/mcpOn Team or Enterprise: an Owner adds Sextant once in Organization settings › Connectors (opens in a new tab) (Add › Custom › Web). Each person then finds it in Customize › Connectors, clicks Connect and approves it with their own Sextant account.
On your phone: add the connector on the web or in Claude Desktop first. A connector you added there also works in the Claude phone app.
Connect ChatGPT
Sextant is an app in ChatGPT’s app directory. You connect it with one click, with no address to paste.
- Open Sextant in ChatGPT (opens in a new tab).
- Click Connect.
- ChatGPT opens Sextant. Sign in with your Sextant email and click Allow.
- In a new chat, type @ and pick Sextant, or start your message with @Sextant.
Other AI apps
Any AI app that supports remote MCP connectors with a sign-in can use Sextant. Add a custom connector (some apps call it a remote MCP server or a custom app) with the address below, sign in to Sextant and click Allow.
https://app.sextantweb.com/mcp- Developer tools and agents: add the same address as a remote MCP server. The tool opens a Sextant sign-in page.
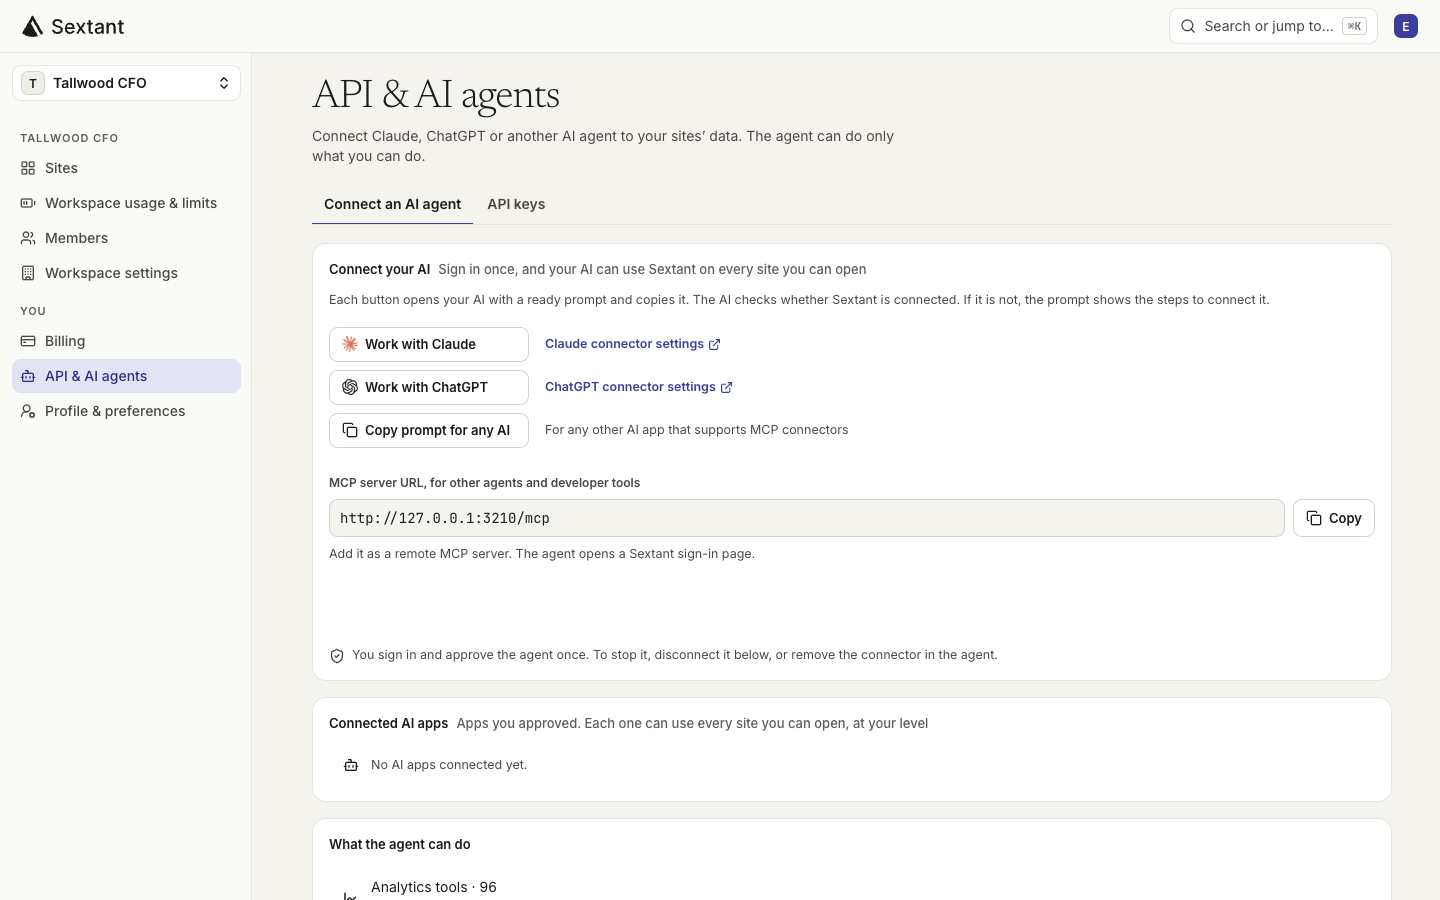
- From Sextant: API & AI agents › Connect an AI agent has Work with Claude, Work with ChatGPT and Copy prompt for any AI. Each one opens or copies a prompt that checks the connection and shows the steps if it is missing.
What you approve when you connect an AI app
Every AI app ends on the same Sextant page, which asks whether to connect it. The page names the app, says whether Sextant could verify it, and shows where you go back to after you choose.
- Read your sites’ analytics and SEO data: always included.
- Make changes and run paid lookups: on by default. Changes are Sextant settings such as goals, notes, the business profile, tracking options and invites. Turn it off for a read-only AI, with the Viewer level on every site.
- AI apps cannot create API keys, connect other agents, buy or change plans, delete accounts or transfer ownership. Sextant cannot change your website.
Click Allow. Your AI app then works on every site you can open, at your level on each one. Use Sextant with your AI lists every tool it can use. To stop it, click Disconnect next to it under Connected AI apps on API & AI agents, then remove the connector in the app.
Use Sextant without an AI app
The AI connection is optional. Choose Here, step by step to set up your site in the dashboard. The sidebar groups pages by question:
- Overview: the site at a glance.
- Visitors: Traffic, Live, Sessions, Segments & cohorts, Retention.
- Getting found: Sources, Links & campaigns, Google search, Rankings, AI visibility.
- Engagement: Pages, Events, Journeys, Heatmaps, Replays.
- Conversions: Goals, Funnels, Revenue, Attribution.
- Site health: Site audit and Speed.
- Research: Keyword ideas, Competitor lookup, Backlinks and AI answers, the paid lookups.
- Saved: Saved keywords and Notes.
Some pages offer buttons that copy a ready prompt for your AI, such as Copy AI prompt to fix on a site audit. They are shortcuts, never required.
Scheduled checks in your AI app
Sextant runs weekly ranking, AI answer and site-audit checks. If your AI app supports scheduled tasks, use those results to prepare a regular summary of changes and priorities.
- Send your AI the routine below once, and check the answer.
- In Claude (paid plans), ask it to run the task every week, review the details it proposes and click Schedule. In Cowork, use Scheduled › New task.
- In another app, schedule the same prompt if the app can schedule tasks. If it cannot, keep the prompt and send it each week.
Every Monday, use Sextant for my site example.com:
1. Compare the last 7 days with the week before: visits, top pages, sources, goals and Google searches. Say what changed and why it matters.
2. Check the latest site audit, keyword rankings and AI answers. List new problems and new chances to be found.
3. Suggest the 3 most useful fixes, in order. Ask me before any paid lookup.Fix common problems
No visits showing
- Publish the site after you add the code, open the live site in a new tab, then click Check now in Enable Tracking.
- Make sure the code is in the site-wide head, not in one page’s settings, and that it is there only once.
- Visit your own domain. Staging and preview addresses (webflow.io, a Framer preview, a builder’s editor) do not count unless you add them to Allowed domains.
- Your own browser may not count: Recommended settings skip browsers that ask not to be tracked, and ad blockers can block the script. Try another browser, or ask someone else to visit.
- WordPress: clear your caching plugin. If a speed plugin delays JavaScript, exclude t.sextantweb.com.
- A strict Content-Security-Policy must allow https://t.sextantweb.com in script-src and connect-src.
- Cookie banners and bot protection can stop the automatic test visit even when real visits count. Open the site yourself and watch the Live page.
- Google Tag Manager: use the Tag Manager code, then Submit and Publish the container.
Google says the site is not verified, or it is missing from the list
- Search Console lists verified sites only. Use Don’t see your domain › Let Sextant verify it, or verify it in Search Console and click Refresh properties.
- “Google cannot see the record yet” after you add the DNS record means the change has not spread yet. Click Verify now again later.
- Connected the wrong Google account? Click Connect another Google account.
- “Google needs you to connect this account again”: click Connect again.
- Search data still empty after you pick a property: Google sends its first data some time after verification.
Your AI app cannot connect, or sees no sites
- Use the exact address https://app.sextantweb.com/mcp.
- Sign in on Sextant’s page with the email of your Sextant account. A different email creates a new, empty account, and the AI sees no sites.
- “This request expired” on the approve page: start connecting again from your AI app.
- Claude: turn Sextant on in the chat’s + › Connectors. The Free plan allows one custom connector. On Team or Enterprise, an Owner adds the connector first.
- ChatGPT: start your message with @Sextant. If Sextant’s app (opens in a new tab) shows no Connect button, your workspace admin may need to allow it.
- The AI says it is not signed in, or its access expired: remove the connector, add it again and click Allow.
- A site is missing: the AI sees only the sites you can open. Ask the site’s Owner to invite you.
- Nothing happens when you click an AI app in setup: your browser blocked the new tab. Allow pop-ups for Sextant and try again.
Other problems
- No sign-in email: look in your spam folder, then click Send the link again, or use Continue with Google.
- “This invite is for another email”: sign in with the address the invite was sent to.
- “Payment is overdue”, or the workspace has all the sites its plan allows: the Owner updates the payment method or chooses a bigger plan in Workspace usage & limits.
- “Paid”, “Needs approval” or a refusal in your AI: the action costs Research credit, needs your approval first, or needs a higher level on that site.
Still stuck? Support says how to reach a person on the Sextant team.